Porsche Macan Forum banner
161 - 180 of 265 Posts
They need to fix there emission/radiation problem …. Not add band aid fixes.
As was stated in this reply it is very common to use ferrite beads as part of resolving emission issues on a product.

The emissions are addressed by a layered approach, with the greatest flexibility at the initial design stages, when components are selected, frequently working with the component manufacturers, also frequently using a reference design kit obtained from the manufacturer as a starting point.

The design then progresses, including factors like selection of the circuit board size, quantity of circuit board layers, product layout and inclusion of optional population components for selective features and for addressing things like this conducted emission issue.

They might have permitted additional filter capacitors or inductors to change / control emissions, or not. They might have already maxed out their initial design emission components.

They might have determined from their testing that the device was good, but for some reason when installed on the Macan it is problematic.

Given the Fitcamx fully released product stage there is much less flexibility for design changes, so solutions like ferrite beads are commonly used to attain that last bit of emission control.

Even though the manufacturer hasn't chimed in yet, the low-cost / easy ferrite bead fix has been 100% successful on resolving the conducted emission issues. Maybe they will chime in, maybe they won't.

"my search continues" - what is the status of that vehicle camera selection search?
 
I am curious what is the solution to getting this to fit correctly when you have lane change assist and have the hardware behind the trim panel above the mirror? I can’t get that to fit correctly with the two wires that come out of the camera. Help please!
Do these images assist w/ your question?

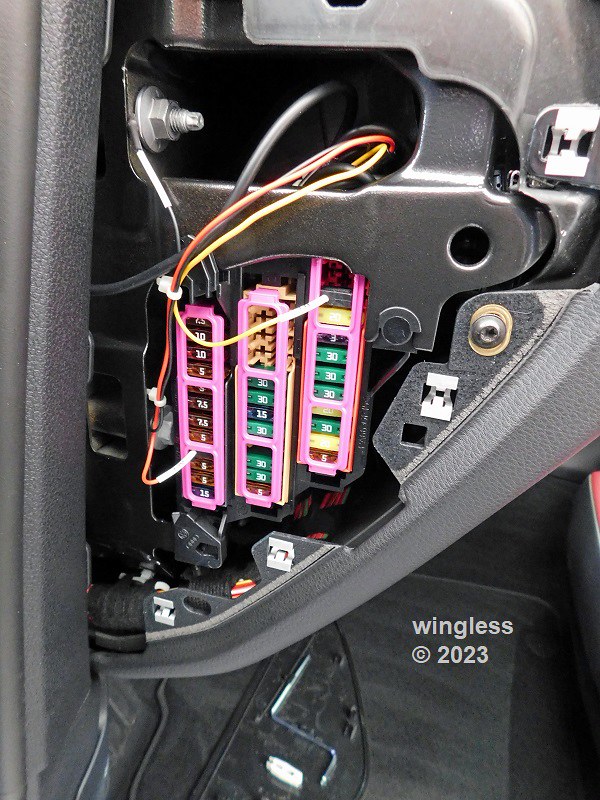
Note, because mine used the optional side fuse panel wiring, this is the only panel that was required to be removed for the front camera installation.

As is shown in my images, I unplugged the small connector so that panel wouldn't be dangling during the installation.


Image


Image
 
Hey does anyone have links or part numbers for the metal clips that hold the dome light? I bent mine and wanted to install new ones instead of bending them back in place. If anyone has replaced them, please help me out, thanks!
 
The installer seems to have resolved the interference issues with the door lock/unlock and the FM stations. A couple of the AM stations still have a slight static/ringing sound, but it's much better than it was before and is tolerable. They told me they moved the cable further away from the rear camera, which seems to have improved the issue. It seems like if you are connecting to the dome light rather than the fusebox, you won't have these issues.
This five piece snap on ferrite bead set was ordered and received. Various tests were conducted. It was discovered that using three of these ferrite beads fixed the door lock problem 100% of the time. A bead was used on the red wire, yellow wire and black wire. The bead was placed on the long wire section between the inline fuse and the round black jacket. There were six wraps (six passes through the core center), on each wire, w/ one ferrite bead used for each wire color.
As an update, I was still having some interference issues with the door lock and a couple of the AM stations, so I installed the ferrite bead set that @wingless recommended. The AM stations appear to be fine now, but the door lock is only slightly improved, but not 100% resolved. I was only able to do max five wraps through the core center on each wire since they didn't appear to be long enough. @wingless - How did you get it to wrap six times? Does it help to use a ferrite bead for the thicker black cable?
 
As an update, I was still having some interference issues with the door lock and a couple of the AM stations, so I installed the ferrite bead set that @wingless recommended. The AM stations appear to be fine now, but the door lock is only slightly improved, but not 100% resolved. I was only able to do max five wraps through the core center on each wire since they didn't appear to be long enough. @wingless - How did you get it to wrap six times? Does it help to use a ferrite bead for the thicker black cable?
Don't know about how, other than what is shown in the text and images.

Yes, a different, larger snap on ferrite bead w/ as many passes as possible over the black cable jacket will provide additional RF attenuation for the three conductor power cable and will change the door lock issue, possibly providing final resolution.

After living w/ mine for a while I'm still getting door lock issues about 10-20% of the time. I haven't had a chance to investigate further, but will provide updates if anything changes.
 
... I was only able to do max five wraps through the core center on each wire since they didn't appear to be long enough. @wingless - How did you get it to wrap six times? ...
Don't know about how, other than what is shown in the text and images.
Update, the fuse panel wiring has been slightly modified to add additional different ferrite beads.

During that process it was discovered that the prior ferrite beads indeed only had five passes through the core, NOT the six passes that was incorrectly reported by me.

That prior post will be updated to correct that error.

Sorry for my having added to the confusion.
 
My Macan is used infrequently.

As was reported, even w/ the prior ferrite bead fix my experience is that about 10-20% of the time the door lock function is adversely affected by the Fitcamx camera system. It has been observed that sometimes touching the exterior handle to lock the doors is ignored until the existing recording has completed.

Prior to adding that ferrite bead fix that exterior lock function was inhibited virtually all of the time, until the recording completed, evidenced by the camera blinking lights stopping.

The fuse panel power cord has been modified again by me. This is an "easy" low-cost modification.

The modification is to add three of these ferrite beads to the existing harness. Nothing on the existing wiring needs to be disconnected or reworked.

Just make three passes (verified by me) of the three-conductor black power cord through the hinged open core, then snap the ferrite bead shut. Lightly / carefully snug the cable to be close to the ferrite bead. Add a total of three of these new additional ferrite beads onto that black power cord.

Then tuck this ferrite / cable assembly into the cavity above the driver's side fuse panel and snap on the fuse panel door.

This solution was verified by me using this test:
  1. Start engine and run for 20 seconds, so camera system starts running. Observe camera driver's side blinking lights to verify recording. (Note, my camera system has been modified to cover those blinking lights w/ a small piece of black electrical tape. That tape segment has been removed during the duration of this testing to permit observation of the LED indicators.
  2. Turn off engine, exit vehicle and close door.
  3. Verify blinking camera LED indicator then touch door handle to lock door.
  4. Grab door handle to unlock door.
  5. Open and close door.
  6. Lock then unlock door by touching door handle.
  7. Repeat 1-6 ten times.
It was discovered that there were zero issues observed during the entirety of this testing.


Image


Image
 
@scoresman, just keep waiting. They will either respond or not.

In the meantime, I will continue using my Fitcamx camera system and my vehicle.

There are other solutions, but NONE have the integrated appearance (including / especially that offered by Porsche) of the Fitcamx.
 
My Macan is used infrequently.

As was reported, even w/ the prior ferrite bead fix my experience is that about 10-20% of the time the door lock function is adversely affected by the Fitcamx camera system. It has been observed that sometimes touching the exterior handle to lock the doors is ignored until the existing recording has completed.

Prior to adding that ferrite bead fix that exterior lock function was inhibited virtually all of the time, until the recording completed, evidenced by the camera blinking lights stopping.

The fuse panel power cord has been modified again by me. This is an "easy" low-cost modification.

The modification is to add three of these ferrite beads to the existing harness. Nothing on the existing wiring needs to be disconnected or reworked.

Just make three passes (verified by me) of the three-conductor black power cord through the hinged open core, then snap the ferrite bead shut. Lightly / carefully snug the cable to be close to the ferrite bead. Add a total of three of these new additional ferrite beads onto that black power cord.

Then tuck this ferrite / cable assembly into the cavity above the driver's side fuse panel and snap on the fuse panel door.

This solution was verified by me using this test:
  1. Start engine and run for 20 seconds, so camera system starts running. Observe camera driver's side blinking lights to verify recording. (Note, my camera system has been modified to cover those blinking lights w/ a small piece of black electrical tape. That tape segment has been removed during the duration of this testing to permit observation of the LED indicators.
  2. Turn off engine, exit vehicle and close door.
  3. Verify blinking camera LED indicator then touch door handle to lock door.
  4. Grab door handle to unlock door.
  5. Open and close door.
  6. Lock then unlock door by touching door handle.
  7. Repeat 1-6 ten times.
It was discovered that there were zero issues observed during the entirety of this testing.


Image


Image
Will have to try this.

My alarm will arm; but about 20% of the time, the locking sound will not be made even though the car locks and the alarm is on.

I’ll report back when I have a chance to try and test this.


Sent from my iPhone using Tapatalk
 
FWIW, I 100% agree that Fitcamx SHOULD arrive at a solution to this problem, not me. They should already have the personnel, experience and equipment on-hand. IMO, for some reason they just need more existing customers with this problem to request this issue to be resolved. They expressed to me they have zero interest for investigating the issue when I reported it to them because "I was the only one w/ the problem".

Now that I'm retired I don't have after hours access to a waaay cool engineering lab that would permit me to quantify the issue. Plus I sold all my personal engineering instruments, so I am unable to perform the measurements that would show EXACTLY the problem, permit identification of the best ferrite bead(s) to fix the problem and quantify the results of different solutions.

So instead the fixes shown are my "shotgun" solution, based on many decades of experience, readily available low-cost parts, with the sole objective of problem resolution.

My speculation is that w/ appropriate effort, equipment and experience this problem could be 100% resolved w/ two ferrite beads (probably different parts), instead of the six that are the solution.

On the plus side, there is zero issue w/ available space and zero delta on the existing cost, due to minimum package quantity.

Based on my limited testing there is not an adverse effect that has been identified from this solution, plus 100% resolution of the problem. The best option is for this to be implemented on multiple vehicles w/ the results shared and for those test vehicles to get lots of usage. Again, my vehicle will have zero usage for a week, followed by limited usage afterwards, so I won't be providing more information for a while.
 
Will have to try this.

My alarm will arm; but about 20% of the time, the locking sound will not be made even though the car locks and the alarm is on.

I’ll report back when I have a chance to try and test this.
Great, I look forward to your test results.

When you update please confirm that all the parts I specified were used and in the method I identified, or if anything was changed to "equivalent" parts / methods.

Also, my issue only existed while the Fitcamx existing one minute recording was completing, as evidenced by sometimes problem when the Fitcamx driver's side blinking LED light, then 100% normal operation when the blinking light stopped flashing. Please include your observations of the blinking LED light during the vehicle testing results.

Very interesting that yours affected the alarm chime sound, where mine affected the lock function, not the sound.

Thanks in advance for your result reporting.
 
Finally got around to this. I did use "equivalent" parts and will show what I used/did.

I used uxcell 7mm Ferrite Cores Ring and 5pcs Inner 13mm 0.5inch Filters on the power harness/cable from FitCamX.

With the 7mm cores, I added 2 to the red/yellow/black wiring that connects to the fuse panel. I wrapped the cables around the core and closed it shut. Then I used the 2 of the 13mm cores on the remaining harness. I was able to tuck everything behind the fuse panel.

Image


Image


After putting everything back in place, I tested per instructions/process from @wingless

1. Start engine and run for 20 seconds, so camera system starts running. Observe camera driver's side blinking lights to verify recording.
2. Turn off engine, exit vehicle and close door.
3. Verify blinking camera LED indicator then touch door handle to lock door.
4. Grab door handle to unlock door.
5. Open and close door.
6. Lock then unlock door by touching door handle.
7. Repeat Steps 1-6 ten times.

It seems to have resolved the alarm locking chime/sound issue where the chime/sound would not sound 20% of the time when the camera is still recording with lights blinking after shutting off the Macan. I'll continue to monitor to see if the fix holds up.

Thanks @wingless for the detailed write-up and continued investigation into this.
 
Does anyone have the standard room light connection completed and the camera working correctly ?
I have the camera, bought and paid for.. but do not want to install it with all of the add on stuff.. just a simple room install and room light connection.
 
Does anyone have the standard room light connection completed and the camera working correctly ?
I have the camera, bought and paid for.. but do not want to install it with all of the add on stuff.. just a simple room install and room light connection.
Yes, there are plenty already documented in this now very long topic.

Note that method does not permit the parking impact monitoring as the power from that overhead light times out.
 
The other potential benefit of the optional power cord is that some online users shared that removal of the overhead center lamp assembly was difficult, with some reporting broken clips. That potential difficulty is eliminated when using the optional power cord because the only windshield parts requiring removal w/ this method are: the windshield mirror clamshell shroud is retained by hidden clips, released by prying apart (replaced w/ the slightly larger Fitcamx camera shroud); the large low-profile windshield shroud between the mirror and the headliner, retained by pry off / push on hidden clips (shroud maybe for the rain sensor) and the driver’s side fuse panel cover (easy to pop off / on). The overhead center lamp assembly does NOT need to be removed when using the optional fuse panel power cord is used for the installation. FWIW I disconnected the cable for the windshield shroud illuminated indicator during the installation to permit having that panel out of the way instead of dangling.


Windshield Shroud
Image

Image
Note, according to this video in this reply at time index 1:00 that airbag connector cannot / should not be disconnected because it will cause the vehicle airbag dash lamp to illuminate and remain illuminated, unless turned off by the dealership service tools.

Mine was disconnected, the airbag lamp remained illuminated and service tools were required to turn off that lamp.

Note, there is an easy release catch which permits shroud removal, while keeping that small airbag lamp dangling in-place. That is the correct process at this stage.
 
Does anyone have the standard room light connection completed and the camera working correctly ?
I have the camera, bought and paid for.. but do not want to install it with all of the add on stuff.. just a simple room install and room light connection.
Yes, there are plenty already documented in this now very long topic.

Note that method does not permit the parking impact monitoring as the power from that overhead light times out.
This video shows a small aluminum module under the windshield shroud next to the mirror.

The connector on that module matches those on the Fitcamx short wye cable. When installed at that location both the yellow insulation (+12VDC always on power) fuse and the red insulation (+12VDC switched power) have +12VDC immediately after the vehicle ignition is turned on and both lose +12VDC immediately after the ignition is turned off.

If this is the correct location for that short wye cable then that is GREAT, because the shroud removal is "easy" and the overhead lamp assembly is difficult. Also the clips retaining the overhead lamp assembly bend during removal requiring replacement.

My plan was to use that Fitcamx wye cable to supply power for my radar detector, but I haven't gotten that working yet. I am certain that it has power, but I haven't confirmed ground, so I don't yet know why this isn't working to supply power to my radar detector. I won't be able to finalize that until next week.
 
This reply shows my having repurposed the unused wye cable for my mirror mount radar detector. This is the wye cable that came w/ my Fitcamx front/ rear camera system, unused because I also purchased their direct wire fuse panel power cord.

Points of interest...

Some have reported that removal of overhead console dome lamp to use this cable is very difficult, frequently resulting in bent retention clips.

What I discovered is that this cable also "works" on the Front Camera Control Unit connector that is exposed when popping off the shroud at the base of the front rear view mirror, against the windshield. Note my 2022 Macan does not have the Surround View parking camera option, so my speculation is that this hidden module is for a windshield wiper rain sensor.

The Fitcamx wye cable plugs into that module connector, but the provided wiring is not compatible w/ the Fitcamx camera system when plugged into this module.

It is possible to rework the wiring on this wye cable so that it can be used to power the Fitcamx front camera, to eliminate the requirement to remove the overhead center console. Those instructions are detailed in this reply.


Image


Image
 
161 - 180 of 265 Posts