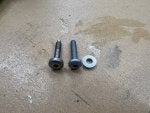
If you're talking about the steel screws they supply I wouldn't be too troubled about a genuine Porsche part. According to their part number they are screws for retaining one of the air bags. The washer does matter. Is it a split spring type washer, a wave spring washer or a plain [steel?] washer?
Sorry for the formatting guys. My thinking chair involves alcohol.
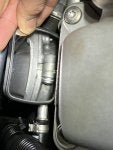
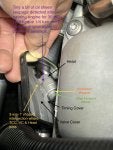
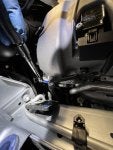
Yes, the yellow circle in the second picture is going to be the problem bolt.
It’s interesting that the new bolts come with a washer. I’m guessing to keep it from moving? It looks like there are two more a little deeper that I’ll be able to get to as well. I’m really hoping that will get the job done. If it doesn’t I’m not totally sure I have the desire to remove the whole front of the car… but I’m cheap and I have trust issues so that’s probably what will end up happening.
Was the torque spec for the new steel bolt decided? I feel like I’ve screenshot a bunch of stuff but I can’t find it. I think for the time being I’ll order eight bolts. Six for the top that i just found and then I’m going to go ahead and replace the two that Porsche did since I don’t trust them.
I’ve got some video I took that I may try and post on YouTube. I’ll need to edit it some but I’ve never messed with that so it might be a few days.
I don't think anyone has actually posted the torque spec for the M6 Steel fastener and aluminum washer swap yet. I think Santirx mentioned using 9 NM plus additional 45 degrees clockwise tightening rotation. The Steel fastener specs will likely be different.
As it stands right now in my case with steel fastener and aluminum washer, I'm at least at 9 to 10 NM plus additional 45 degrees before I could notably say I think the seepage has stopped on the driver side. My guess is I'm at about 11-12 NM at this point as I've verified that my mini torque wrench clicked at 9 NM and then I continued to wrench further 45 degrees further with a slim 1/4" hex head socket wrench. A typical Grade 8.8 M6 fastener has max torque spec of 11.8 NM. I'm still working on the passenger side and will run motor for 30 minutes and inspect tonight. I'm also using the Permatex high temp thread sealant which should in theory lower the required torque requirement...
My first attempt before being able to fit my torque wrench into the slot was done by feel which I don't recommend anybody try to do because I still had a little seepage on passenger side and greater seepage from driver side. If it helps, something in the range of 3" depth from the tip of the T30 head to the back of the torque wrench would fit best. At 4" depth, I was able to barely get it to fit onto the passenger side, but no go for fitting on the driver side.
5/4/22 Update:
I had the torque wrench set at 10 NM and snugged both Steel screws up while engine was cold. Both screws were coated with high temp thread sealant, so can be treated as a lubricated fastener. Before running the engine, I wiped cleaned both sides down with alcohol water and paper towel. I then ran the engine for 20 minutes with the inspection camera taking a photo every 10 mins to try and capture progress of any oil seepage.
Passenger Side: After 20 minutes, I could clearly see a light but distinct oil seepage line from the TCC gasket line just below where it intersects with the valve cover. I then shut the motor off and wiped the area off to confirm that there was still oil seepage on the paper towel. Being impatient and not wanting to wait a day for it to cool down, I decided continue to torquing the Steel fastener on the warmed up engine at 10 NM again which rotated easily another 45 degrees to 60 degrees before the wrench clicked.
Driver Side: After 20 minutes of running, the camera could not detect any seepage at all. This is the one that I believed to have been resolved the day before already. After turning off the engine, I went ahead and put a paper towel onto the area to see if I could detect any oil on the paper. I was able to find just trace amounts of oil on the paper towel. It was faint but there. With the engine still warm, I proceeded to tighten the driver side TCC fastener to 10 NM as I did on the opposite side and able to rotate nearly 90 degrees before hitting 10 NM.
Final Test: With both sides cleaned off lubricated screws torqued to 10 NM on a warmed up engine, I ran the engine for 30 minutes total and took a photo during that run every 10 minutes. I was unable to detect anymore seepage coming from either side on the camera after 30 minutes. I turned off the vehicle, removed the air filters once again and wiped the TCC screw area off with a paper towel to see if I could detect any seepage on the paper. To my surprise, the paper towel was finally clean on both sides. Finally no more seepage. My process was definitely not the best and I probably should have been torquing with the engine cooled down, but I was out of patience to wait another day to resolve this issue. If I had done all this with a cold engine, my non-professional presumption would be that the cold torque spec is near 11 NM, but take this with a grain of salt until we have the Porsche torque spec information.
Just wanted to share my journey and results with the 2-bolt TCC fix. In hindsight, I should have called around to dealer service departments to ask what the cold torque spec for this steel M6 fastener should be. That would have made this fix happen in a fraction of the time without having to continually check after running and snugging up the fasteners until the seepage stopped. Also, I should have been wearing heat resistant gloves as I burned the top of my hand a little on the hot engine while wiping up some dirty dried up oil I found. 🤕
Parts used:
Steel Screws: N91097101
Aluminum Washer: 99902519330
Permatex High Temp Thread Sealant coated on screw threads


 ?
?