Porsche Macan Forum banner
141 - 160 of 179 Posts
@Santirx what is that orangey coloured substance around the drain plug? Some kind of sealant?
Yes. These are tapered plugs that need sealant in order to seal threads and avoid prevent leaks. These plugs come with that sealant pre-applied.

Hence why is important to always use new plug (at least for the drain side), but these are cheap enough and I would not take the risk… Both the drain and fill plugs were new.
 
I changed my TC oil today on my 2019 Base, at 23,000 miles.
There was some metal particles/sludge on the magnetic drain plug.
Pic of old oil:
View attachment 262721
Thanks, that's interesting. Definitely makes the case for regular fluid changes. I've seen it suggested that rust can develop in the TC if water gets in there. Yours doesn't look as though there's any rust particles [or rusty sludge?] though.

Jules
 
Thanks, that's interesting. Definitely makes the case for regular fluid changes. I've seen it suggested that rust can develop in the TC if water gets in there. Yours doesn't look as though there's any rust particles [or rusty sludge?] though.

Jules
Install ARB ventilation in the tc. You can even use it to fill the TC easily when you change it every 10k.
 
Yes, I'm going to drain the old fluid first. As I understand it, there is a filler plug and also the vent hole used to fill new fluid. My Q is why not just fill through the vent hole?
The supplied recommendation will overflow the replacement. That is why there is such a required refill sequence. Word on the wise, I have read here and on other forums, is to be really careful about tightening the plug as it can easily over tighten it and split the case. Go light and then snug it up if it drips.
 
The reason for the 2-step drain and fill procedure is that the case contains two oil reservoir areas, the upper one is behind the side fill plug, and that's why the procedure is to use a "J" shaped tube to reach down to the bottom of the upper reservoir to suck the fluid out of that. When the bottom drain plug is removed, then the bottom reservoir fluid emptied.

The two-step fill procedure fills the upper reservoir through the side plug, and then the lower reservoir is filled through the top air vent.

From what I see (from pics of the internals of the TC), the fluid from the lower reservoir is "pumped" by a slinging action of the rotating clutch assembly into the upper reservoir, and the oil in the upper reservoir flows thru a tube and drip lubricates the center bearing section of the clutch assembly, before it eventually returns back down into the bottom reservoir.

By separately filling both reservoirs (rather than just filling all the fluid thru the top vent), it ensures that fluid is available, right away, in the upper reservoir, so that the clutch center bearing is always lubricated, rather than some delay of waiting for the sling "pump" to fill the upper reservoir, during the first drive after the fluid has been changed.
Thank you for this detailed description!

I wanted to change mine early to remove break-in / wear materials, about 12k miles.

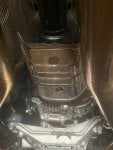
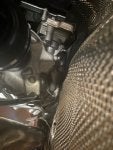
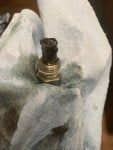
My 23S has a few differences from most of the photos and videos of the transfer case: It has a magnetic drain bolt (with a white sealant) instead of a hex plug, and a metal shield between the transfer case and exhaust pipes. It's bolted to the transfer case with two triple square bolts (M13 I think).

I can drain the transfer case through the bottom drain bolt with the shield/cover in place, but it blocks the side fill plug. I decided to leave it on and partially drain and fill a few times while starting the car in between each drain/fill to see if that would mix the old and new fluid.

Initial drain from the bottom was ~325mL. Fluid was nearly black and the bolt had some black metal paste on it. I added 325mL through the top vent (used Red Line MT-LV) using the same syringe from Amazon - thank you again!

I drained a total of 3 times and by that time the fluid coming out looked close enough to the new fluid. My simple math calcs show, assuming 500mL total inside and 325mL drains and 100% mixing of old and new fluid, 35% of old fluid remains after initial drain, 12% after the 2nd, and 4% after the 3rd. One more drain/fill would have been <2% old fluid.

Runs smooth, can't tell the difference in before/after.

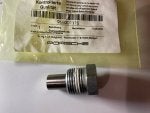
P/N for the magnetic drain bolt: 95B301115
 
A few photos of the cover, drain bolt prior to draining, triple square bolt on the right side of the shield (black protective vent cap above and to the right), and metal paste on the magnetic drain bolt.
 

Attachments

Could you tell if that drain bolt is tapered? In your picture, it’s not bottomed out - is that the final position? I wonder if this helps avoid cracked cases that some have had from the tapered bolt.
 
Could you tell if that drain bolt is tapered? In your picture, it’s not bottomed out - is that the final position? I wonder if this helps avoid cracked cases that some have had from the tapered bolt.
Doesn't appear tapered but it's hard for me to tell and I don't have a caliper to measure. Here's another (potato) pic of the original bolt after I cleaned up the oil and metal paste, next to the package from the new one I bought from the dealer.

The pic above in my earlier post shows the original bolt in its original position as it came from the factory, just after removing the under body panel and before draining the transfer case oil. I hadn't touched it yet. It was protruding, not fully seated, and only threaded nearly to the end of the white sealant.
 

Attachments

141 - 160 of 179 Posts