Porsche Macan Forum banner

Introduction and summary of mods to my new to me 2018 Macan S...

2 reading
7.7K views 41 replies 15 participants last post by  ryeager  
#1 ·
Trim:
S
Year:
2018
This is both an introduction and a post on mods. I am new to the site, but not to Porsche.

My first Porsche was a 2001 Boxster. I modified the heck out of the car, and was a regular on the Porsche Pete’s Boxster board back in the day (username GreggZ). That car NEEDED a lot of mods, as it was really a very basic car focused simply on driving. Not even a cupholder. Porsche has come a long way with luxury and convenience since then.

I kept that Boxster until 2011 and replaced it with a 2011 Boxster S. Numerous improvements over the earlier models, and still a great driver to this day. I might just keep it forever.

Latest addition is a 2018 Macan S. Have only had it for a about a month but it’s already provided miles of smiles. Honestly it’s exceeded my expectations. For a two ton SUV it handles like a Porsche and somehow feels much lighter. Toss in a good amount of luxury, utility, and Porsche styling and there is lot to like there.

When I started looking at Macan’s I spent a lot of time searching this forum. It’s a great resource and thanks to all who have contributed over time. The one thing about forums is that they are exceptional at creating a “NEED” for things that you didn’t even know existed the day before. But I knew what I was getting into and have been down this road quite a few times over the years.

So here’s a list of what I have done so far to the car. I am sure there will be more to come, but for now pretty darn happy with where I am at.

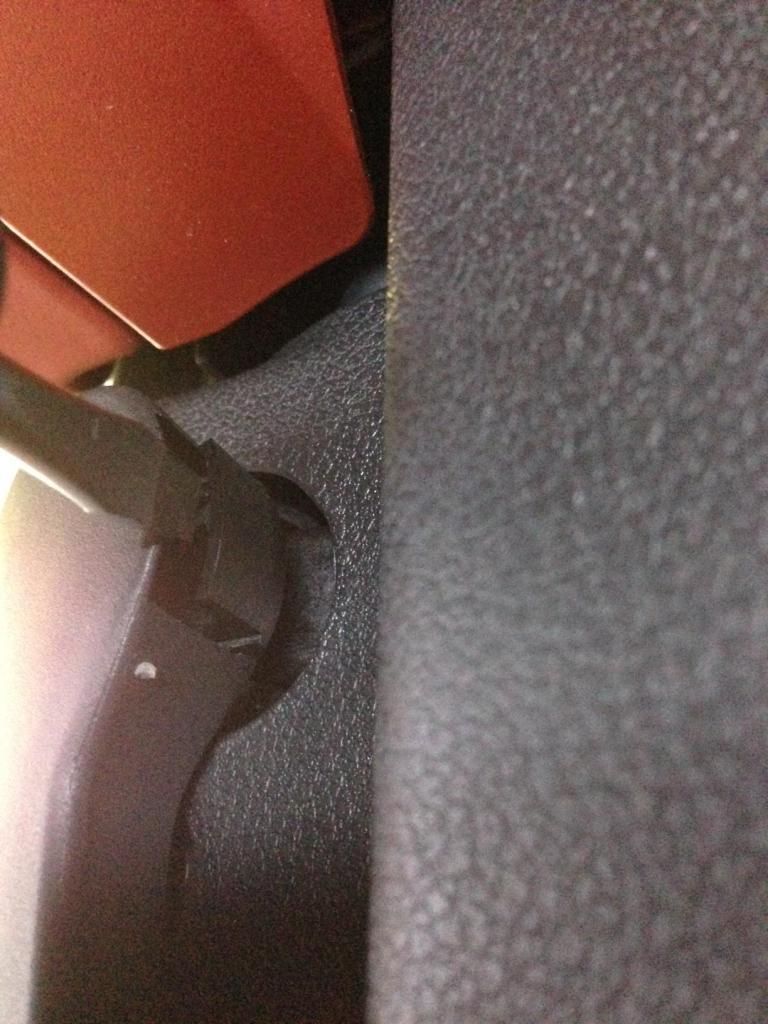
Very first mod was smoked LED side markers. The orange on black just didn’t fit. Installing the first one took a few minutes to figure out how to release the clip but the second one was done in seconds. Well worth the small investment. Looks better both during the say and at night when it lights up.

Preview of gallery image.
 
#2 · (Edited by Moderator)
Next was to remove the model designation. With both the Porsche and Macan S lettering so close to each other it just looks too busy back there for me. I much prefer the clean look with it removed. Somehow makes the car look wider in the back. Same is true for Boxsters…..the rear end just looks better without the Boxster script.

Preview of gallery image.

Preview of gallery image.

Next was hard wiring a Uniden R3. I have one in my Boxster and it has saved me countless times over the years and gives me piece of mind. I mounted it up high right along the top of the glass. Ran the power cord in the trim above then down the pillar. Picked up power in the driver side fuse box. First column on left and third spot down is a good switched power source. Ground to a bolt just above the fuse box. Super easy 15 minute job at most.

Preview of gallery image.
 
#3 · (Edited)
I bought some aluminum rubber pedal/footrests that were very cheap. Didn’t expect much but figured it was worth the risk. Turns out they fit perfect and look great. Also added trim rings to the Instrument panel. Again was not overly optimistic, but turned out very nicely. It’s a matter of personal taste, but I like the extra pizzaz they add to the cockpit.

Preview of gallery image.

Preview of gallery image.

While I am on the interior, here’s one of my favorites. Some cheap console storage pouches are working out perfectly for me. When I had another person in the car with beverages, there is just no good place to place your cell phone. When I was alone I would toss it in the cupholders, but it kind of got in the way of how my arm rests. Or I’d throw it on the passenger seat then it would slide all over the place. I didn’t want a “mount”, as once I am connected to Android Auto no need to see the screen. Added these and they are working out well. Just slide my phone in when I get in the car and it’s unobtrusive. So unobtrusive that I have found I sometimes forget to take it with me when I exit the car!

Preview of gallery image.

In the last picture you might have noticed the small control LCD screen mounted to the inside edge of the center console. It’s tiny, and in person if I didn’t tell you it was there you would never notice it. It’s for another mod, the 9-Drive Throttle Controller. And yes I know there are many who prefer one of the ones that cost 5 times as much, but for me I was a bit of a sceptic and just wanted to see what all the fuss was with these things without too much of an investment. Well I can now see why so many like them. Really wakes up the car and makes you feel like you are in Sport mode full time. Even my wife likes it! For $45 well worth the cost, and not to make this a debate but I can’t imagine the others are much different. The only tricky part is getting the gas pedal back on. A tip I read here somewhere came in handy. Once you get the pedal in place, use the box it came in to prop up the pedal while you get the screw back in.

And here is a pic from above. The storage pouches are barely visible from above and actually look like they could have been there from the factory. You can't see the 9-Drive throttle controller from above either. I would have to point it out for anyone to notice it.


Now I know some will either LOVE or HATE this one. But makes little difference to me. My wife thought they were cool so I added LED Porsche Emblem puddle lights to all of the doors. Good for a giggle and didn’t cost much. The few people who have noticed them loved them. Is it too much? Maybe but who cares.

Not a very good picture as t wasn’t dark enough out yet but you get the idea.

Preview of gallery image.
 
#4 ·
Next one is one of the two bigger mods. I added the Suncoast Porsche Macan Front Spoiler kit. To me the front end looks like it needs something more down there, and in my opinion the splitter does the trick. Makes the car look more sporty and aggressive. And again, the important thing is my wife likes it too! Installation wasn’t really too bad. Since there are no instructions it’s kind of like solving a puzzle. Thank goodness folks like @Santirx have posted nice summaries of their installations. Still even then it takes some time to understand how it all works together. But once you get it figured out it’s something anyone can do. I am very, very happy with it and it makes me smile every time I see it.

Here’s the patient right before I got started.

Preview of gallery image.

Preview of gallery image.

And here it is with it freshly installed.

Preview of gallery image.

Preview of gallery image.

Preview of gallery image.

Preview of gallery image.
 
#5 ·
Now on to the other larger project. My car came with the Bose system. I tried to like the Bose system. I mean I REALLY tried to like it. Told myself it will be good enough. Well that lasted about two weeks. I’ve had custom stereo builds in pretty much every car I have ever had. When you are used to upgraded systems, the Bose just doesn’t cut it. The set up starts with a JL Audio 10TW1-4 10” sub inside a custom enclosure which slides into the spot where the Bose sub is located. It’s driven by a Pioneer gm-dx871 mono subwoofer amplifier providing 300 watts at 4 ohms. Also added JL Audio C2-075ct 3/4" silk dome tweeters to the front and rear door tweeter locations, along with Audison AP 4 midranges to the front doors and Audison Voce AV 3.0 midranges to the rear D Pillar.

All in about $1,100 total, and I couldn’t be happier. The system is crisp, clear, and free of distortion. Plus it hits you pretty hard when you crank up something with some good bass notes.

Here’s some general thoughts on the upgrade. The #1 improvement is replacing the subwoofer, closely followed by replacing the tweeters. When you remove the Bose sub enclosure, it’s shocking how light it is. The JL sub weighs over 10 pounds, and the Bose one feels like it’s less than 2. I found the Bose tweeters to be shrill and fatiguing, and the bass to sound muddy and distorted. When you replace with a good quality tweeter it’s amazing how different the music sounds. You hear things that weren’t there before, and things just sound silky smooth. And a proper sub driven with proper power is a completely different animal. Play something like Dire Straits Money for Nothing and it feels like someone is punching the back of your seat.

The next big improvement is removing the dash center channel. This is a must if you replace the tweeters. That speaker over powers everything else and distorts easily. I will not be replacing it with anything as the system is better to my ears without it. The midrange driver that Bose uses in the dash center is the same one that they put in the rear D Pillar, and again it’s the worst of all of the Bose speakers. So if you are going further than sub/tweeters that is the next one to work on. I also did the front door mids and that will be it. Once you start messing with the door woofers you start going down a road where you really should replace the amp. I wanted to get it as good as I could keeping the Bose amp, and I very, very happy with how things came out.

I didn’t take pictures of the install as there are loads of great instructions here in various threads. But here’s one of the amp and sub installed.

Preview of gallery image.
 
#6 · (Edited)
So that’s for everything I did in the first month or so. I think I am done but who knows?

I also wanted to take a moment to thank everyone who contributes to this site and shares their experience. There is a wealth of information here which I personally have found very, very useful. Communities like this are still the best place to get information and tips, and I am glad this site is here.

One more thing. As much as I already love this car, I do have a few complaints. How in the world did Porsche produce a car where you can’t read the tach or speedo in daylight? Put on a pair of sunglasses and they might as well not be there. If anyone knows of a hack that so that you could see them in daylight I am all ears. I am used to watching the tach when in manual mode with the PDK on my Boxster, but these old eyes have to strain pretty hard for it to be of any use in the Macan.

The back window gets dusty/dirty VERY quickly. Have never seen anything like it. The rest of the car is perfectly clean, but not that back glass. My California car duster is getting a workout!

No remote start. Why Porsche? I’ve heard all the people who say a Porsche shouldn’t have it, but once you’ve had it on several cars not having it seems uncivilized.

Next one is the parking brake on the center console. Twice now I have stopped and somehow engaged it. Both times I was just stepping out for a moment, like at the mail box. Not sure how I did it but I did. Just saying having it right there does not seem like a good idea to me.

And lastly the sun visor doesn’t come down far enough. I leave in the morning heading east right into the rising sun. Even with sun glasses on I have to sit up tall for the visor to be of any use. So I bought this add on visor on Amazon. While it’s not a very elegant solution, it actually does the job quite well.

Preview of gallery image.


Other than that like I said already miles of smiles and thanks again for all the information available here.
 
This post has been deleted
#14 · (Edited)
Another one for ya.

LFOTPP Car Navigation Screen Protector for 2016-2017 2018 P*orsche M*acan PCM 4.0 9 Inch, Tempered Glass 9H Hardness Car Infotainment Stereo Display Center Touchscreen Protective Film Amazon.com: LFOTPP Car Navigation Screen Protector for 2016-2017 2018 P*orsche M*acan PCM 4.0 9 Inch, Tempered Glass 9H Hardness Car Infotainment Stereo Display Center Touchscreen Protective Film : Electronics

Apart from protecting the screen, it turns it from the matte finish into a glossy one. This somehow has the effect of improving the clarity of screen.

Also, sequential turn signals for the mirrors. Flat6 sells a set. I got mine from eBay. No issues so far. They are probably both made in the same factory.
 
#15 ·
Another one for ya.

LFOTPP Car Navigation Screen Protector for 2016-2017 2018 P*orsche M*acan PCM 4.0 9 Inch, Tempered Glass 9H Hardness Car Infotainment Stereo Display Center Touchscreen Protective Film Amazon.com: LFOTPP Car Navigation Screen Protector for 2016-2017 2018 P*orsche M*acan PCM 4.0 9 Inch, Tempered Glass 9H Hardness Car Infotainment Stereo Display Center Touchscreen Protective Film : Electronics

Apart from protecting the screen, it turns it from the matte finish into a glossy one. This somehow has the effect of improving the clarity of screen.

Also, sequential turn signals for the mirrors. Flat6 sells a set. I got mine from eBay. No issues so far. They are probably both made in the same factory.
Thank you! I was running out of things to add and I knew that this was the place to go to find more!!😁

I will be looking both of those over very closely.
 
#18 ·
Found some more for you after reviewing my mods list.


This will be almost a direct fit for the grab handle above the driver side door or any door for that matter. If I remember correctly, I had to trim some tabs on the Volvo part to make it fit and use a couple of washers since the screw holes are larger.

If you don't like how your license plate is screwed directly into the bumper, you can buy the base plate along with 2 screws. It creates a much sturdier mount for the license plate. I think I paid around $35 for both parts from my dealer. There should be two dimples already present on the bumper that directly line up with the base plate mounting screw holes. I added a smoked cover and used black security torx screws from Amazon for a clean look. The torx screws were a little bigger than the holes for the license plate screws but nothing a drill couldn't fix.

License Plate Base (996-701-107-00)
License Plate Base Screws (900-145-012-07)

Anti-Theft Security Screws for License Plate - Rustproof Fastener with Theft-Proof Black Stainless Steel License Plate Screws, Nylon Screw Inserts, Easy Installation Tools for Fastening License Plates Amazon.com: Anti-Theft Security Screws for License Plate - Rustproof Fastener with Theft-Proof Black Stainless Steel License Plate Screws, Nylon Screw Inserts, Easy Installation Tools for Fastening License Plates : Automotive
 
#19 ·
Found some more for you after reviewing my mods list.


This will be almost a direct fit for the grab handle above the driver side door or any door for that matter. If I remember correctly, I had to trim some tabs on the Volvo part to make it fit and use a couple of washers since the screw holes are larger.

If you don't like how your license plate is screwed directly into the bumper, you can buy the base plate along with 2 screws. It creates a much sturdier mount for the license plate. I think I paid around $35 for both parts from my dealer. There should be two dimples already present on the bumper that directly line up with the base plate mounting screw holes. I added a smoked cover and used black security torx screws from Amazon for a clean look. The torx screws were a little bigger than the holes for the license plate screws but nothing a drill couldn't fix.

License Plate Base (996-701-107-00)
License Plate Base Screws (900-145-012-07)

Anti-Theft Security Screws for License Plate - Rustproof Fastener with Theft-Proof Black Stainless Steel License Plate Screws, Nylon Screw Inserts, Easy Installation Tools for Fastening License Plates Amazon.com: Anti-Theft Security Screws for License Plate - Rustproof Fastener with Theft-Proof Black Stainless Steel License Plate Screws, Nylon Screw Inserts, Easy Installation Tools for Fastening License Plates : Automotive
I always use a smoked license plate holder. Keeps the plate clean and just looks better. I got mine at Autozone. Still have to get some black screws as it came with steel ones.

Preview of gallery image.

And funny someone just got in my car yesterday and asked if I missed having an overhead sunglass holder like in my previous car. I like that solution and am going to take a closer look.
 
#21 ·
Yep it's hard to believe. I bought one of the ones pictured above, and having it now for a week or so will buy one for the passenger side. Like I said, it's not really a great solution and is a bit hokey, but hey, it works.

The sun was blinding me in the morning or early evening to the point of being unsafe. Had to do something.
 
#23 ·
Aha!!! Thank you so much this solves the mystery.

Both times I opened the door just slightly to reach further into the mail box (while in gear), and that must have engaged the parking brake. I could not for the life of me figure out how I managed to physically touch the brake switch, and now it turns out I didn't!

That's why I love boards like this. You get answers to questions you might never otherwise solve.
 
This post has been deleted
#29 ·
#40 ·
Hi @GreggZ I'm not able to replace my dead pedal per these instructions: How to remove and install a dead pedal

The instructions say to remove the hood release handle, but mine is attached via a wire at its bottom. The instructions make no mention of it.

Can you share how you replaced yours?
There is a plastic piece that you need to remove. It's located toward the top back of the hood release handle. Feel around where I have the arrow pointed and will find it. Slide a small screwdriver or pick in the there and it pulls out (to the right) fairly easily. Pay attention how it comes out as it goes back in the same way. Let me know if that helps.


And here's a good thread that helped me.

 
#41 ·
@GreggZ That plastic pin is easy to remove, but my problem is different. The bottom of the handle on mine is attached by what seems to be a wire that goes through this hole:

Image


Maybe it is a spring? Or the actual wire that performs the trunk release? Whatever it is, the instructions don't mention it and my handle can't be pulled off of the gear because of it.